Resources on the Web

Here is a summary of resources that are located on the interwebz. If you find other good resources please put them in the comments and I will add them to this list.

How to Build a Wall:

Climbing Holds and Routesetting:

Routesetter.com:

  • A moderately active forum and a blog full of items that may be useful to home wall users (most things are directed to Climbing Gyms and the routesetters in those gyms)
  • http://www.routesetter.com/

Climbing Hold Review:

  • Great resource on specific climbing holds that they have reviewed. Lots of good information here and it helps to see the holds in use and more detailed then on the product websites
  • http://climbingholdreview.blogspot.com/

Home Climbing Walls vs Gym Climbing Walls

Virtually everything in the Artificial wall world revolves around gym climbing; holds, wall materials, advice, etc is generally created to help gym owners, professional route-setters, climbing hold companies, and climbing wall companies work together better. There is very little information that specifically targets the “Home Climbing Wall Consumer”.

Here are some of the main differences between your home climbing wall and a gym:

  • You can do whatever the hell you want: yup that’s right, there is no wrong way or right way to build a wall, buy holds, play around on your wall, or set routes. There are things that may work better then others and those tips are in this website, but anything you can imagine can be created.
  • Home walls are relatively easy to build: It’s just plywood, 2×4’s, screws, and t-nuts. You don’t need to worry about stress loading with 30 climbers on a single wall or how “aesthetically pleasing” your wall is or the “environmental impact” that your massive building has.
  • Home walls are easy to maintain: If built right the most you will ever have to do is fix a few t-nuts or fine tune a few supports. My outdoor wall has sat through two years of pretty intense rain/snow without anything protecting it and structurally it is still fine; some things need to be fixed but there have been no real problems.

Items that Appear Necessary but are not:

  • Textured Paint: If you are into textured paint go ahead and paint your wall. I am not a fan as it is expensive and I don’t like it when I hit my knee or scrap my elbow on textured paint as that sucks. It is not necessary and on a 30+ degree wall essentially useless. Foot-chips are cheap and much more worth it then textured paint.
  • Screwing Holds/Volumes/etc into your wall: In a gym with fancy textured paint and expensive fiberglass panels you don’t want to be screwing things into those walls. In your home climbing wall it should be encouraged. Screwing Volumes, holds, etc into your wall does virtually no structural damage and minimal to no visual damage (its only a screw). Having three volumes on my wall and several screw holds has only enhanced my wall.
  • Route Tape: Don’t tape your walls. Set freely and maybe set routes but tape on a small wall looks like crap and will rip off the wood.

Hold Buying:

  • In 2005 when I built my first wall it didn’t seem like many hold companies were set-up to sell to individual customers. Today that is much different with many reasonably priced holds, review sites, and plenty of options. It is a good time to own a home climbing wall.
  • Quality: Some of my local gyms have some of the worst climbing holds I have ever seen. Old, nasty, smooth resin holds that haven’t been updated since they opened the wall 15-20 years ago. Other gyms always seem to have a plethora of new holds weekly. Therefore if you feel your local gym has the same old holds you will be pleasantly surprised to find how many options there are and the overall quality.
  • Buy what is right for you and your wall at that time: If you and your friends are V0-v3/4 climbers then buy holds that work for you at those levels. If you are trying to get a bunch of beginnings on your wall make sure you have plenty of jugs and feet everywhere. Buying crazy ass crimpers and slopers for a 30+ degree wall will mean that you have just wasted your money as you will not even be able to use them.
  • Minimize Hold Waste: The one thing I didn’t realize when starting out is that certain companies will include a lot of holds in a set but they will vary significantly in difficultly. When starting out spend a lot of time looking at the holds online and try to visualize how they will work on your wall. Today I have a number of holds that have come in sets that have never been used because of this “hold waste”, and in some sets only a couple holds were ever that great anyways.
  • Starting out with a new wall:
    • Keep it Simple: At first you have no idea how to buy holds or what to look for as each company markets them differently and each hold will be different on the wall. Look for a good starter kit and buy that. Once you get an idea of how those holds climb you can fill in the missing pieces with new sets. Just don’t rush into a massive order to start your wall.
    • Buy Slowly: Once you have climbed on your wall for a while (and had friends/etc over) you will have an idea of what you need to work on (more crimps/slopers/jugs/feet/etc). If at first you buy a new set every other month for a year (6 sets, ~30 new holds, ~$300) you will get the holds you need in the most cost effective manner. I have seen people go out and buy several hundred dollars worth of holds right away and 6-12 months later realized that the 40 jugs they have are not challenging, are boring and you end up not climbing as much.
    • Get a good starter set: A good pack of 30-50 holds (with a few of everything) is a good start. I wouldn’t buy more then that from any company (mainly because I like diversity) and generally the starter packs will allow you to set a couple really good problems.
    • Look for deals: Mountain Project, Craigslist, local gear shop, local gym can all have the possibility of a great deal. Once I bought ~$450 worth of new holds for $100 from a guy desperate to sell them because he was moving; not always possible but keep your eyes open.
  • When bored with the wall buy new holds: A lot of people have complained about how they build their wall and then they are bored with it 6-12 months later. A lot of this is because they are using the same holds, the same sequences, the same movements, etc. New Holds bring new life into the wall (and for $35-50 can really add a lot of motivation).
  • Volumes are KING!: Building a volume can drastically change your wall. A simple small triangle can add numerous new hold placements, movements, sequences to you wall. Plus they are insanely cheap for their value to the wall.

Holds for Your First Wall

Holds are by far the most expensive and one of the most important elements of any climbing wall. The other difficulty is that choosing the first set of holds for your wall is insanely challenging due to the enormous amount of companies and options.

What this will focus on is the basics and what you need to get through the first couple of months of your wall. Holds are essential but you can get by with minimal $ and minimal holds if you think through the process right.

What we Did for Our First Wall:

Below is a kinda shitty photo of my first wall (somehow didn’t ever take that many photos of it) but it demonstrates what you can get by with in terms of holds relative to the size of your wall.

First Climbing Wall in Tall Garage right after being built. 8ft wide x 16 ft long, ~14 ft high, ~30degrees

The wall is roughly 8 ft wide with 16 ft of length standing roughly 13-14 ft high (a really awesome set-up) and roughly 30 degrees. On the mid-right you will notice that we had to chunk out a piece to make it work around the rafters so not a true 8×16 of climbing surface area but it was plenty of surface area.

The important thing to note is the minimal amount of holds. At the top we have two ending jugs. In the middle is ~30 holds that range from crimper to pocket size but are spaced out and are set for a number of routes. At the bottom we have 10-15 foot-jibs.

Looking at the wall it appears we have plenty of coverage and have a number of routes which is all you need when starting out. Obviously you can never have too many holds but at the beginning you only need some to start out.

Holds that we Selected for Our First Wall and What to Change:

Below is roughly our process on how we bought holds when starting out, why we selected the holds that we did, and what I would change if I was to do it all over again. Another thing to note is that we all were relatively new to climbing with all of us leading in the 5.10 range but not bouldering above V3 with a number of other friends that were brand-new climbers. Therefore all of my hold suggestions are for the person that when starting out is not really climbing much above v4/5; if you generally flash above v5 these suggestions will be less applicable. Lastly the first wall we built was in the fall of 2005 and since then hold companies may have changed dramatically.

  • Starter Set:
    • We got lucky and had a hook-up and purchased one of the Metolious Mega Packs (I believe the 40 piece) for wholesale as a buddy worked at EMS and got a killer deal. The price was ~$50-65 if I remember right and for that price it was a steal. I wouldn’t spend the money on that set today ($130!) but it was a good starter because it had 1 big jug, a bunch of decent pockets, a couple awesome crimps, and a ton of foot-jibs, etc. Today a couple of the holds from that set are still some of my favorites.
    • Suggestion: There are a number of companies with starter sets out there and the deals are always changing. Check-out the main companies but remember with the starter set you want a number of basic, reliable shapes that anyone can crank on with a lot of different hold types (foot-jibs, crimps, jugs, pockets, etc).
    • What I wouldn’t do: Buy a very large starter set from a single company. There are a lot of sets out there for ~$200 and most of them contain a lot of good holds. However most of the fun/quality of your wall will come from a diverse set of climbing holds. A $200 set may be sweet but I would not want to get much more then that from any single company. Climbing Hold Review did a massive comparison of all $200 sets from most companies that can be found here (hard to navigate but quality info): http://climbingholdreview.blogspot.com/2010/07/200-dollar-question.html
  • Reliable Jug Set:
    • I believe I stumbled upon Atomix Climbing via e-bay and ended-up ordering a set of what they call roof jugs from them. They have been great as the texture is very user friendly and they worked well as bigger holds on the wall that anyone could hold onto. Great beginner set on the 30 degree wall and now make awesome holds on my roof.
    • Suggestion: Generally Starter Sets skimp on the large easier jugs. If yours does look for a large jug set of at least 5 holds to put on your wall. You may need more eventually but this is a great starting point.
  • Unique Test Set of All Around Holds:
    • Once we had the basics down (a mix of holds + some jugs), I purchased the first set of unique holds to experience something new. What I ended up with was a set from SoIll Holds which are classified as Medium difficulty Jugs, they are the Soill Nosebleeds. They were awesome because while they had some juggy positions they were generally fairly difficult when grabbing but still solid. It was a perfect initial harder set that allowed for some creative climbing.
    • Suggestion: Ordering a set that looks really cool but is still versatile is key when starting out. It lets you try out a new hold company (and at that time they were barely starting to show-up in gyms) as each company (and certain holds) have different texture, plastic, and style and some companies you will really like and others you will hate.  So look for something that you think is cool but not insanely difficult or expensive.
  • Random Smaller Purchases:
    • By smaller purchase I mean buying a small hold pack from REI or your local outdoor shop. Generally they have companies like Metolius and Franklin which are good and you can get a feeling for the holds before you buy them.
    • Suggestion: Only buy if you really like the holds. You get to feel what they will be like on your wall before purchase so that is a plus. However generally they are more expensive then online. I prefer to buy directly from the hold companies however have been pleasantly surprised with a few finds at REI and our local shop Wilderness Exchange Unlimited. Also lately it seems the holds at REI are fairly poor in quality/texture compared to most other holds I own therefore buyer beware.
  • Set of Really Hard Holds:
    • My buddy purchased a set of holds for the wall (and he is a much stronger climber then most of the rest of us) and he got another set from Soill. These holds had very small crimper or open sloper type shapes that I believe are based on Fontainebleau sandstone; the Soill Migraines. They are hard holds, awesome texture, look sweet, but were probably a little too hard for the angle of our wall. Still to this day (5yrs later) a couple of the holds have never really been used but a couple of them have always been very good.
    • Suggestion: Buying difficult holds has always been a challenge for me because difficulty depends on the angle and the climber and every hold company has a different rating system. Therefore be aware that when buying a difficult set some holds might never be used on your wall (but that is why volumes are key). When starting out it is awesome to try these harder holds but just know that you might get one or two awesome holds but the others might fall into “Hold Waste”.

Essentially the above purchases lasted us for a number of months and being poor college students we only really bought something when a great deal came-up. Over time we added more sets but only when we got bored with the wall and it suited us throughout college.

Initial Routesetting:

Unless you set routes in your local gym there is a good chance that this is your first time setting problems. Route-setting is one of those things that you really don’t think about when you first build you wall as being a highly critical item to having a successful climbing wall.

Here are some tips for when you first set your wall:

  • Keep it simple: You are just testing the waters, keep all of the movements easy, make sure you understand how to put the holds on the wall and more then likely all of your friends want to come by and try. Your goal is to get people close to the top from the beginning. You have years to work on the harder stuff.
  • Foot Holds are Key: If you wall is 30+ degrees then the feet are the most critical component that determines a routes success or failure. Have plenty of them and have them be good sized at first. Once you get the technique down you can make a problem substantially harder by just changing the feet and not the hand holds.
  • Set Safely: This is your first wall and you may not be sure how people will fall, when holds may come loose and spin, or if something is not structurally sound. Therefore make sure at first that most climbs are in the middle and have plenty of fall protection.
  • Constantly check hold tightness: With a new wall and new t-nuts you will always have to be cranking down on the bolts to ensure their tightness. No one likes it when they are a move from the top and the hold spins and they have an awkward fall.  At the beginning of each session go through and tighten every hold until you get to the point where they are all solid.
  • Minor Hold Changes may be all you need: If something is not working instead of pulling everything down most times all you need to do is add a new foot hold, or change out that crimper with a better hold or move it one t-nut space closer. Tweaks are always necessary and get use to constantly modifying your problems.
  • Set a couple problems and then improvise: With a clean wall add in a couple problems and then fill in the holes with other holds to create variations. At first you may have all of your problems start for one or two areas until you get more holds; the start is less important at first, its the upper 2/3’rds where you want all the action.
  • Find Inspiration: Look to your favorite climbs outdoors, watch cool movements of classics online or in a movie, go to a indoor comp and see what is the most fun, get tips from the internet. Then try to mimic those movements and see what happens.

If you have any more tips please leave them below in the comments!!!

Thanks!

Planning A Climbing Wall

The Goal is simple here: build a home climbing wall using your unique needs, resources, and space. There are a number of items to consider when starting down this path which will be discussed below. All of this is based on my adventures in wall-building (4 different walls) and the current expansion of my existing wall. Let’s get started!

Planning Phase:

This is the phase that I usually rush through and then screw-up something that I need to redo. So I stress to all of you people (like me) that tend to not read instruction manuals or just “wing-it”, spend a lot of time thinking about your wall and the potential possibilities.

There are a number of items to consider prior to building your wall:

  1. Location
  2. Structure Type
  3. Design and Users
  4. Materials/Tools
  5. Budget

All of the above are interrelated and as far as I can tell each is ranked in terms of how important they are to the final product.

Location:

The most important element in building your climbing wall is the location as that determines everything else about the wall (size, design, materials, etc).

  • Indoors or Outdoors:
    • Indoors generally allows for climbing year around but can be greatly limited by height, location, and size. Also realize that climbing is a dirty sport (chalk, rubber, etc) and take that into consideration for the final location.
      • Basements are commonly used but you are generally limited by height (8ft foot ceilings will work but not as much fun as higher stuff).
      • Garages are another great solution as generally they have a lot more height, space, and versatility.
      • Other places unique to your house as there are nearly endless possibilities
    • Outdoors allows for versatility with the wall but you can be severely limited by weather (which is part of the reason you own a wall because you want to climb when it is shitty out).
      • Outdoors also makes your wall more public which can bring unwanted attention (inspection agents, complaining neighbors, bums looking to steal your holds). So an outdoor wall needs to be planned accordingly to fit the area.
      • Outdoor walls work great in places where the weather permits it. In Colorado we are lucky to have pretty good weather most of the year. Generally the only time I don’t climb on the wall is when it is freezing or during Nov/Dec when it is dark at 4:30pm.
  • Make sure the space is enjoyable to spend time in:
    • Heating in the winter and cooling in the summer is necessary
    • Ventilation is always important (chalk dust, sweaty bodies, smelly friends are always present)
    • Areas to rest out of the way of the wall in between climbs or for other climbers is necessary
    • Make sure that the area of the wall will be kept clear. If you have to clear out half of your garage of junk each time you climb, you will be less motivated to climb on the wall.

Structure Type:

The second decision you need to make is based on the structure type. There are two options when building your climbing wall based on the structure:

  • Attach to an Existing Structure (Most Common Application)
    • Best for people who own their houses or have a land-lord that doesn’t mind you attaching to an existing structure.
    • This is entirely dependent on your location and what you have to work with. You are only limited by what already exists
    • Can be a much easier build as the upright supports already exist (and potentially the horizontal/roof supports). Just be aware that you are attaching a structure that can weigh hundreds of pounds with a climber on it; therefore it is very important that the existing structure is strong enough for this application. Most new(er) homes will be fine, however older homes were built to a different standard.
    • Common locations are in unfinished basements, attics, garages, and living rooms
  • Build a Free-Standing Climbing Wall
    • Versatile solution that is best if you are renting or do not have a stable structure to attach to
    • Free-standing walls require some additional considerations to ensure their stability and are usually limited to only reasonable sized walls
    • I have built three different free-standing walls and found them to be relatively easy to create a simple climbing space.
Basement Wall Attached to Existing Structure
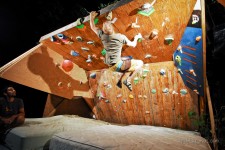
Freestanding Climbing Wall

An Example of a Free-Standing Climbing Wall


Design:

The design of your wall is the most important part of the wall. You want it to be challenging, fun, and have the ability to be modified and take a variety of climbing holds. A vertical wall is the most boring thing you can create while a wall that is all roof will also make you lose interest fast. Generally a 30 degree wall is perfect and adding features such as a roof, arete, or volumes will enhance the wall that much further.

  • Designing Around Who will Use the Wall:
    • The abilities in the climber world range significantly and as a result different walls will suit different climbers. Here are some tips to help design the right wall:
    • Height/Arm-span of climbers: If the main climbers are tall and lanky make sure your wall is taller and wider then other walls.
    • Ability of climbers: Generally the more overhung the harder it will be. While climbing holds dictate most of the difficulty,  a 30 degree wall with jugs is still a challenge to new climbers.
    • Future Ability of Climbers: If you are dedicated but new to climbing you will progress quickly. It is best to make it more challenging at first.
    • Advanced Climber Training: A lot of training exists for advanced climbers generally around running Circuits (consistent climbing to train specific muscles). The Moon Board (Link) is the most famous. Easy to built, great for training. If stuff like that bores you, look to create a challenging but unique wall that provides for different types of moves (traverses, vertical movement, aretes, roofs, campus moves, etc)
  • Tips for Designing:
    • Keep it Simple: A flat surface overhanging surface is extremely versatile. Adding angles and bends directly into the wall makes the project that much harder to engineer and build. Holds and Volumes add the variety to a flat wall.
    • Make it as Tall as you Can: 8 ft of vertical is not much and traverses get old. Try to get a good 10-12 ft of height and at an angle this gives you several moves of climbing
    • No Less then 8 ft wide
    • 20-45 Degree Angle is what you want: vertical is boring
    • Design Around Using Minimal Materials: Wood comes in standard sizes and modifying your plan slightly to meet those lengths makes sense (if your wall angle is not perfectly 30 degrees no-one will notice). Especially based everything around the 4ftx8ft sheets of plywood.
    • Adding a Roof at the End is Nice: If possible adding a short (2-3ft) vertical roof at the end adds a few extra moves and helps “complete” the boulder problems.
    • Physically plan in your building space: In the location of the wall bring in a few long 2×4 wood pieces and physically see how much space the wall will take-up. Get an idea of the wall angle, where attachments will be, where the pads will be, where spectators will sit, etc. This will help figure out the final design.
    • Lastly be Flexible as You Build: Plans always change as you actually start building. Be prepared for that.

Simple Design Idea: ~30 Degree Wall

  • The most straightforward design is a 30 degree wall that is completely flat. A lot of climbing holds are made for this angle and nearly every type of hold can be used to enhance difficulty or make it easier. Also this angle forces you to use more upper-body strength and work on feet technique.
  • User Group: All ability types can climb on this angle if you have the holds for them. Beginners will need larger jugs and solid feet while more advance climbers will need harder movements and tricky feet.
  • Location: The below design allows for you to quickly modify as needed to work in your location.
  • General Design: Efficiency is the name of the game. Minimal cutting, minimal material waste and minimal carpentry work is the goal.
    • 8ft wide and 12 ft long of climbing panel is a good starting point. At 30 degrees this puts the top of you wall at ~10.5 feet. At 16 ft of climbing panel your wall will be almost 14ft high which is a really good height.
    • If you only have an 8ft ceiling I still recommend the 8ft wide and 12 ft of climbing panel, but your angle will be harder at ~40 degrees, however the surface area is really important. At 30 degrees the wall surface will only be 9.5ft long which is not enough space.


Triangle Calculator Tool to determine Height and Length of Wall: 

  • Here is a link to a decent online tool which helps you figure out the size of your wall:
    • http://saltire.com/HTML5/Triangles/Triangle%20Given%202%20Angles%20and%20the%20Included%20Side.html
    • The tool is not perfect so you will have to tilt your head to visualize it
    • Input 10 into Side BC. This will be the height of the wall (modify to the height of your space)
    • Input 90 degrees into Angle ABC. This will be the top corner of the wall. (always keep this value)
    • Input 30 degrees into Angle BAC. This means the wall will be 30 degrees (adjust as necessary 20-45 degrees)
    • The output of Side AC will tell you the length of climbing panels you will need.
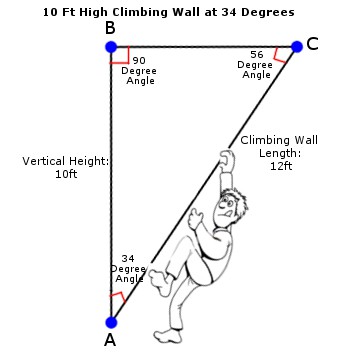


Sample Wall at 10ft high, 34 Degrees, 12 ft of Climbing

Sample Wall Angle at 10ft high, 12 ft of Climbing


Tools:

The tools you use will either frustrate you or help make your job easier. When we first built the wall we used minimal tools (mainly because we were in college and didn’t have access) and the whole process took a lot longer, had major issues, and frustrated the hell out of us. The nice thing about tools is if you buy good ones they will last for many years of abuse.

Suggested tools and uses:

  • Corded Drill: On a wall you will need to screw in nearly 5lbs of screws, batteries die quickly on cordless but you keep on rocking with corded drills (plus they are less $$). A good one will run about $60.
  • 3Lb Hammer: When you have to pound in several hundred T-nuts you want something that will do it right the first time. A 3lb hammer makes you more efficient and it is a useful tool for a lot of other things that might come-up. A regular solid hammer works good but make sure it is quality and not crap.
  • Circular Saw: The only cutting tool that you will need. With smart design on your wall you will need to only cut 2×4’s, more complicated walls might require other cuts but the circular saw is the most versatile saw for your needs.
  • Extension Cord: Spend the money and it will make your life that much easier. I like the Rigid ones that light up when plugged in.
  • Quality Drill Bits and Screw Heads: A fresh drill bit will make sure you are drilling those t-nut holes square without damage to the wall. Screw heads will break so have a few extra on hand.

Budget: 

Expenses are generally a key consideration when building a home wall. I have several other articles on expenses which you will find in the navigation. In general plan on the whole thing costing about $250-350 in hard material expense. Additionally about $200 worth of holds will get you started on your home woody.


[important] Continue to Learn More for Wall Planning[/important]


My Home Climbing Wall

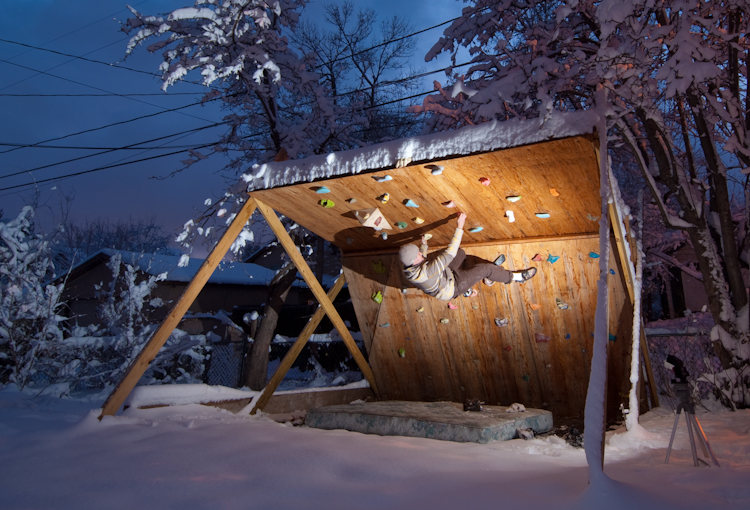
The Woody:

Yep…it is a lot of fun. Granted it has some interesting obstacles, however it is a real sweet climbing wall.

I have a fair amount of experience building climbing walls and as a result have learned a lot about climbing holds, route-setting, and building stuff along the way. It is really fun to have projects like these and enjoy them with your friends.

So welcome to my wall and since I like to talk, I decided I could post a lot more my ramblings here for posterity.

Enjoy!!!!

More Information on My Climbing Wall:

  • Wall Specifics:
    • Free-Standing Climbing Wall
    • Sits outdoors in the elements
    • Top and back is covered with house siding sheets to prevent weather damage (and also makes t-nut access difficult)
    • 12 ft wide and ~9 to 10ft at it’s highest (effective height is ~9ft due to upward slope of ground
    • Bottom Section of the wall:
      • 12ft wide by 8ft long x ~6 ft tall (due to angle). Angle is ~30 degrees
      • Built using 3 4×8 CDX plywood sheets and a 2×4 frame
    • Roof/Upper section of the wall:
      • 12 ft wide x 6 ft deep angle set at ~70 degrees
      • Built using 3 4×8 CDX plywood sheets, mostly a 2×4 frame with a 2×6 header across the front span. Additional strength beams run across the top middle (2×4’s joined together) to prevent sag in the middle span.
    • Supports:
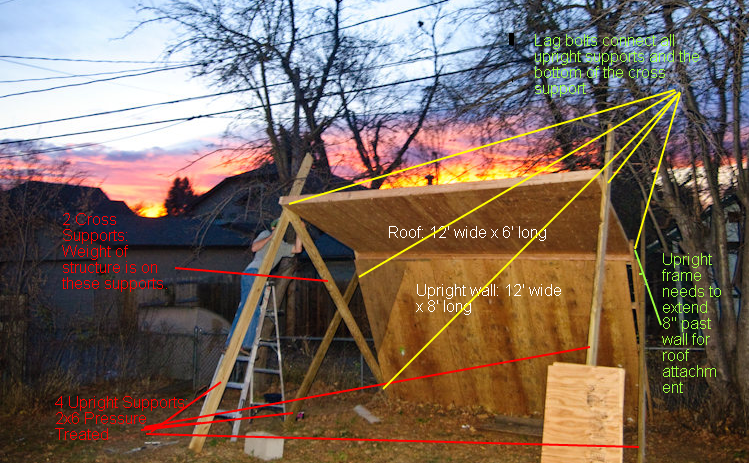
      • 2×6″ pressure treated beams, length varies
      • 2 short ones support the bottom section of the wall.
      • 2 long beams attached to the outer points of the upper roof and go out into the ground. These keep the wall from tipping forward.
      • 2 beams that run from the bottom corner of the wall to the upper corner of the wall. These provide all of the strength of the wall and prevent it from caving in on itself. These were installed last once all of the angles were figured out.

Volumes:

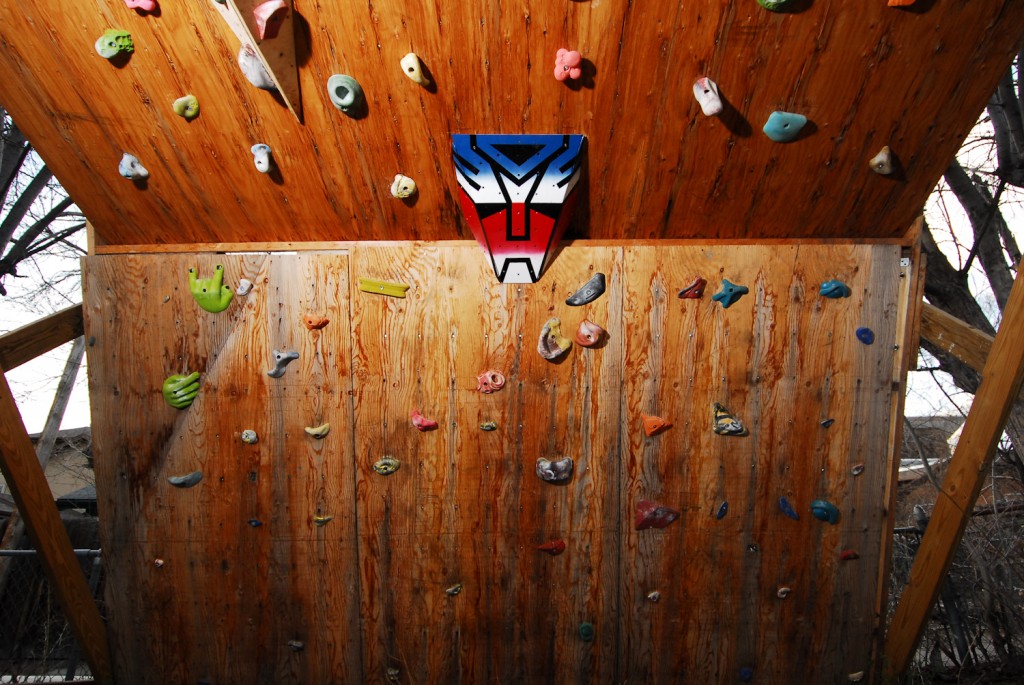
  • Optimus Prime is my custom volume that I built. I have other volumes but Optimus makes the wall.

Photo Gallery:

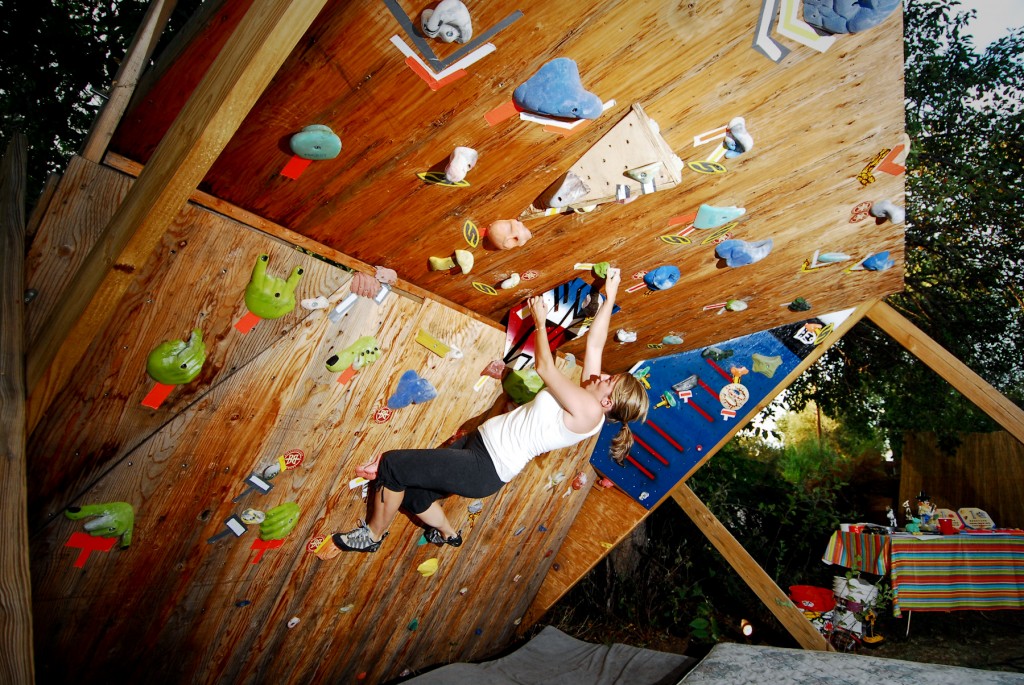
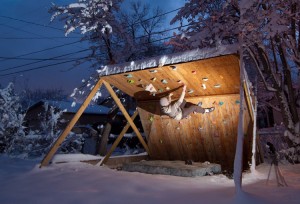
Here is Whitney climbing on the wall during my first Bouldering Comp at my house (that is why all of the routes are taped). This gives a good view of the transition between the bottom and the top walls. The far blue painted thing is an addition that I screwed directly onto the supports.

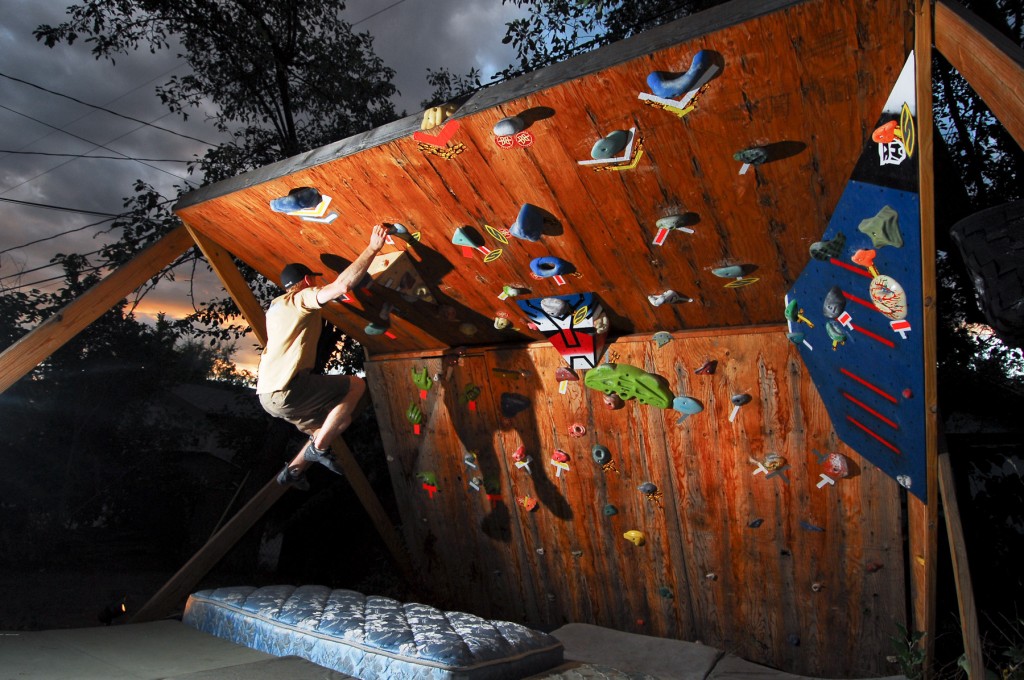
Here is a view from the other side of the wal. Here you can see the blue addition on the RH side and that it is out on an angle. Here Jake is climbing a problem that traversed mostly along the roof and ended with both hands where his RH  is in the photo. The wall gives you the opportunity to have enough moves to feel like a real boulder problem.

This is from when I first put on the Optimus Prime Volume with a picture taken from the ground. The volume in the upper LH corner of the picture (that is partially cut-off) is a simple triangle volume that I screwed onto the roof which adds a number of cool moves.

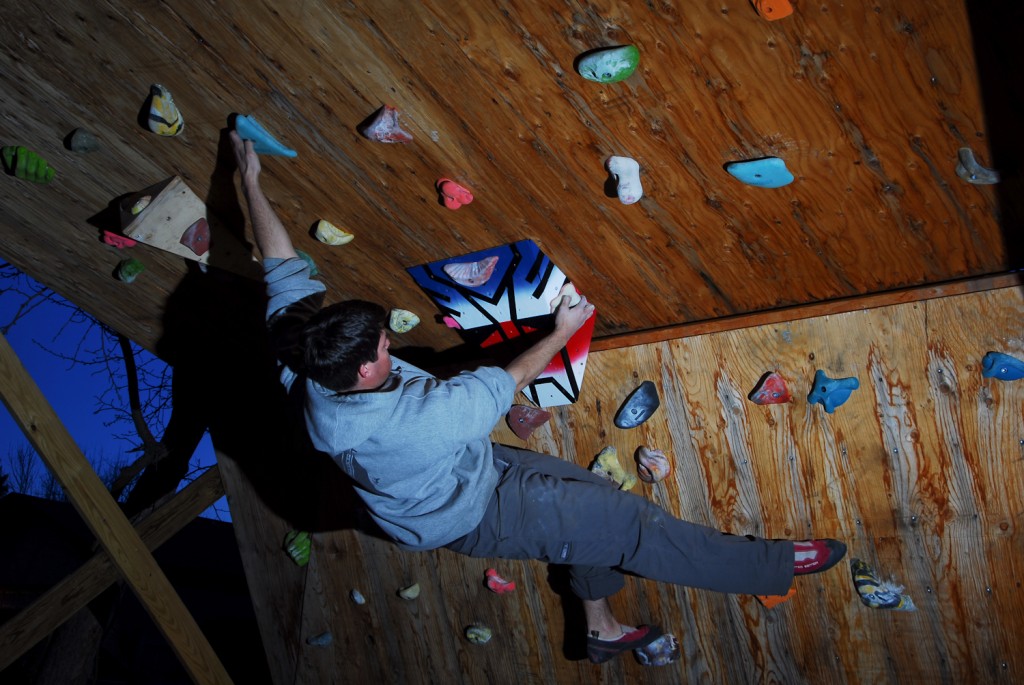
Here I am climbing on the Optimus and reaching onto the roof. Volumes add so much to any climbing wall that not having them means you are not utilizing your holds/wall space to its fullest.

Writings about Home Climbing Walls, Climbing Holds and Route-setting:

Photo Details of How the Wall is Built:

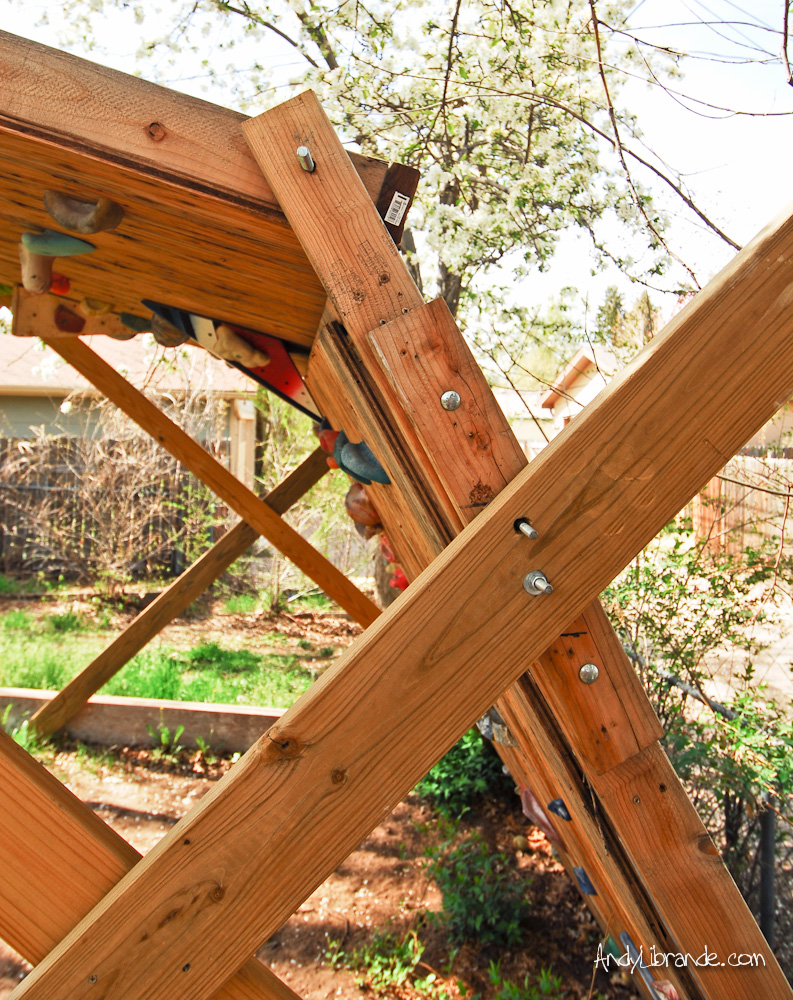
Below is a close-up view of the top roof section connecting to the bottom free-standing section. A simple pivot design and the attachment is pretty easy as long as you make sure that the bottom section is built with additional length on the upright so that it can attach.  This also shows how I attach the lower uprights onto the lower wall (the spot where there are two bolts and only one has a washer/nut). Note this is a pretty messy build:

Free-standing Wall Construction

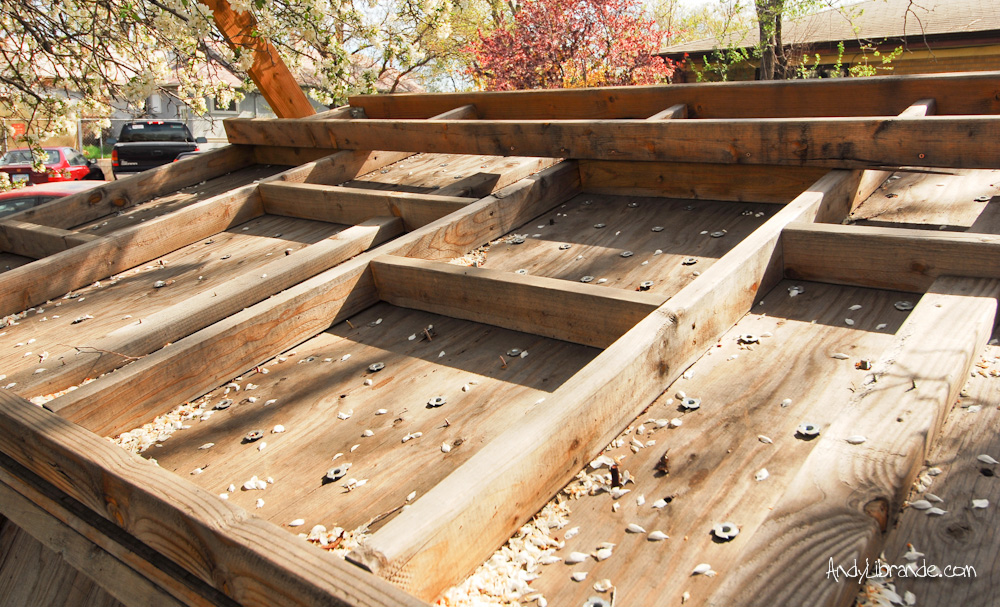
Below is the top of the roof of my climbing wall. This shows you the general frame structure. This could have been built a lot more cleaner then this. The most important thing to note is the long 2×4 that is upright spanning the top of the roof; that acts as a major reinforcement and keeps the roof from sagging in the middle since I only built this with 2×4’s. This was eventually covered with house siding material because the weather was severely damaging it:

Roof Frame of a Free-standing Climbing Wall

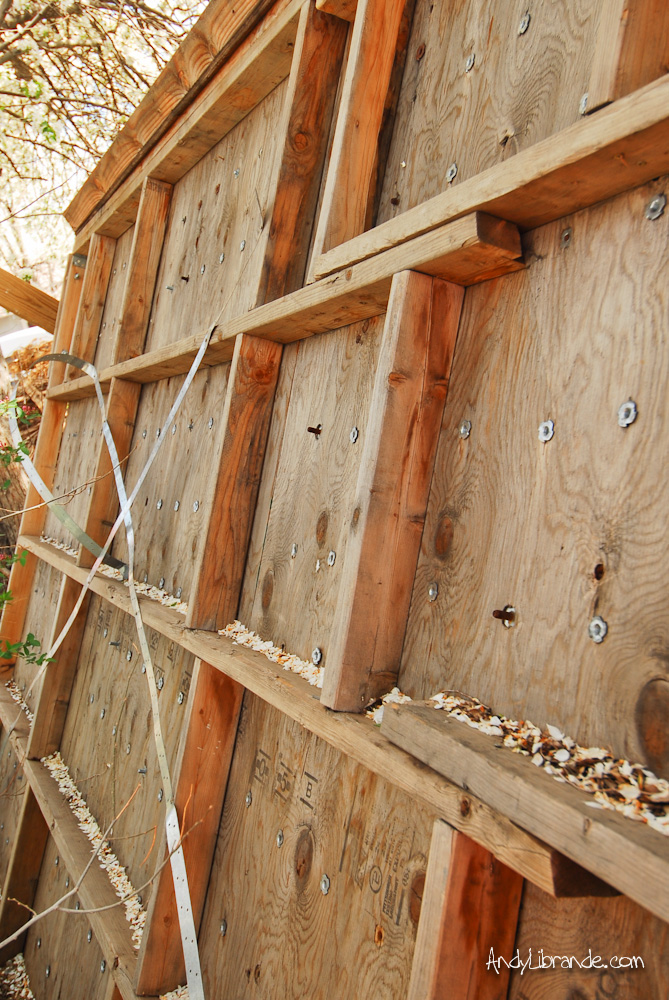
Below is a photo of the backside of the bottom section of my wall. The frame was pieced together from another climbing wall and that is why it looks so messy and if recreating it should look a lot cleaner then this. The metal strips (which are not fully screwed down) help keep sway from happening in the wall and where eventually fully secured to the wall. This section I eventually covered with House Siding material to keep the water/snow/dirt from rotting the wood:

Backside of a Free-standing Climbing Wall

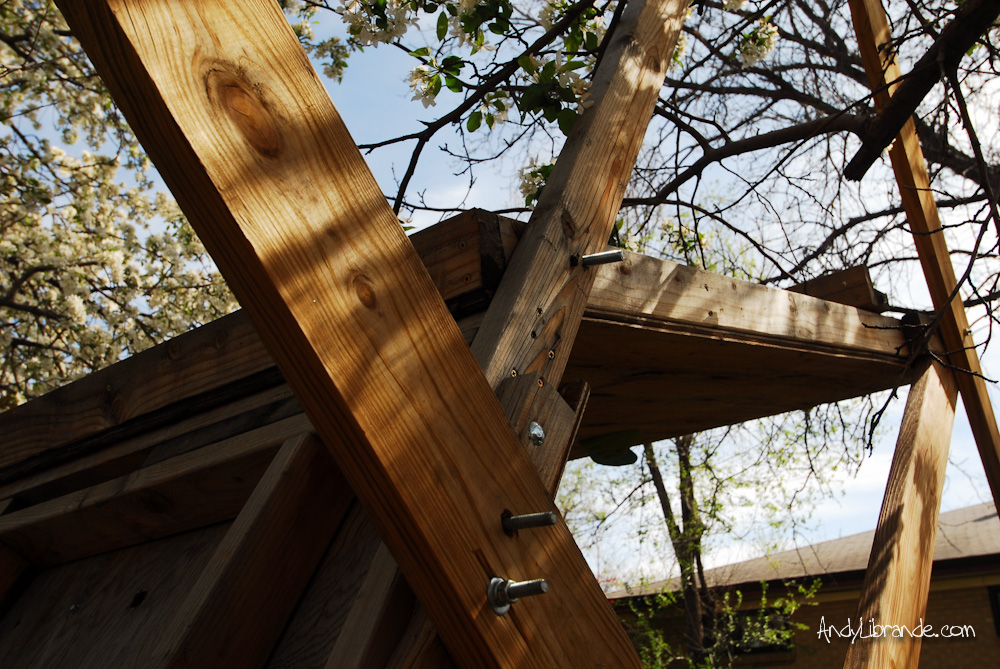
Below is another photo of the upper attachments on the climbing wall. On the left is the attachment of the upper frame to the lower frame and also shows the lower support attachment (the two bolts, one with a washer/nut and one without). Also in this photo on the upper right side is how the upper supports attach to the wall (kind of obscured by the branches). The 2×6 that is angled from the bottom of the photo and is cut into the joint is very important and is used to keep the wall from collapsing on itself; this is a solid attachment with screws instead of bolts. The other 2×6 running from the right and straight-up is the outer support that keeps the wall from tipping forward; it is connected by one bolt in the photo (another was added later) and the top section sticking up past the wall was trimmed down:

Building a home woody

Lastly here is a overview photo of each of the components to the structure of the climbing wall: