
The Goal is simple here: build a home climbing wall using your unique needs, resources, and space. There are a number of items to consider when starting down this path which will be discussed below. All of this is based on my adventures in wall-building (4 different walls) and the current expansion of my existing wall. Let’s get started!
Planning Phase:
This is the phase that I usually rush through and then screw-up something that I need to redo. So I stress to all of you people (like me) that tend to not read instruction manuals or just “wing-it”, spend a lot of time thinking about your wall and the potential possibilities.
There are a number of items to consider prior to building your wall:
- Location
- Structure Type
- Design and Users
- Materials/Tools
- Budget
All of the above are interrelated and as far as I can tell each is ranked in terms of how important they are to the final product.
Location:
The most important element in building your climbing wall is the location as that determines everything else about the wall (size, design, materials, etc).
- Indoors or Outdoors:
- Indoors generally allows for climbing year around but can be greatly limited by height, location, and size. Also realize that climbing is a dirty sport (chalk, rubber, etc) and take that into consideration for the final location.
- Basements are commonly used but you are generally limited by height (8ft foot ceilings will work but not as much fun as higher stuff).
- Garages are another great solution as generally they have a lot more height, space, and versatility.
- Other places unique to your house as there are nearly endless possibilities
- Outdoors allows for versatility with the wall but you can be severely limited by weather (which is part of the reason you own a wall because you want to climb when it is shitty out).
- Outdoors also makes your wall more public which can bring unwanted attention (inspection agents, complaining neighbors, bums looking to steal your holds). So an outdoor wall needs to be planned accordingly to fit the area.
- Outdoor walls work great in places where the weather permits it. In Colorado we are lucky to have pretty good weather most of the year. Generally the only time I don’t climb on the wall is when it is freezing or during Nov/Dec when it is dark at 4:30pm.
- Indoors generally allows for climbing year around but can be greatly limited by height, location, and size. Also realize that climbing is a dirty sport (chalk, rubber, etc) and take that into consideration for the final location.
- Make sure the space is enjoyable to spend time in:
- Heating in the winter and cooling in the summer is necessary
- Ventilation is always important (chalk dust, sweaty bodies, smelly friends are always present)
- Areas to rest out of the way of the wall in between climbs or for other climbers is necessary
- Make sure that the area of the wall will be kept clear. If you have to clear out half of your garage of junk each time you climb, you will be less motivated to climb on the wall.
Structure Type:
The second decision you need to make is based on the structure type. There are two options when building your climbing wall based on the structure:
- Attach to an Existing Structure (Most Common Application)
- Best for people who own their houses or have a land-lord that doesn’t mind you attaching to an existing structure.
- This is entirely dependent on your location and what you have to work with. You are only limited by what already exists
- Can be a much easier build as the upright supports already exist (and potentially the horizontal/roof supports). Just be aware that you are attaching a structure that can weigh hundreds of pounds with a climber on it; therefore it is very important that the existing structure is strong enough for this application. Most new(er) homes will be fine, however older homes were built to a different standard.
- Common locations are in unfinished basements, attics, garages, and living rooms
- Build a Free-Standing Climbing Wall
- Versatile solution that is best if you are renting or do not have a stable structure to attach to
- Free-standing walls require some additional considerations to ensure their stability and are usually limited to only reasonable sized walls
- I have built three different free-standing walls and found them to be relatively easy to create a simple climbing space.

Basement Wall Attached to Existing Structure

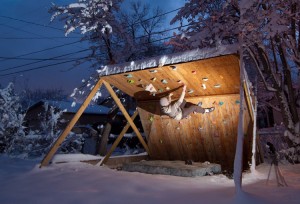
An Example of a Free-Standing Climbing Wall
Design:
The design of your wall is the most important part of the wall. You want it to be challenging, fun, and have the ability to be modified and take a variety of climbing holds. A vertical wall is the most boring thing you can create while a wall that is all roof will also make you lose interest fast. Generally a 30 degree wall is perfect and adding features such as a roof, arete, or volumes will enhance the wall that much further.
- Designing Around Who will Use the Wall:
- The abilities in the climber world range significantly and as a result different walls will suit different climbers. Here are some tips to help design the right wall:
- Height/Arm-span of climbers: If the main climbers are tall and lanky make sure your wall is taller and wider then other walls.
- Ability of climbers: Generally the more overhung the harder it will be. While climbing holds dictate most of the difficulty, a 30 degree wall with jugs is still a challenge to new climbers.
- Future Ability of Climbers: If you are dedicated but new to climbing you will progress quickly. It is best to make it more challenging at first.
- Advanced Climber Training: A lot of training exists for advanced climbers generally around running Circuits (consistent climbing to train specific muscles). The Moon Board (Link) is the most famous. Easy to built, great for training. If stuff like that bores you, look to create a challenging but unique wall that provides for different types of moves (traverses, vertical movement, aretes, roofs, campus moves, etc)
- Tips for Designing:
- Keep it Simple: A flat surface overhanging surface is extremely versatile. Adding angles and bends directly into the wall makes the project that much harder to engineer and build. Holds and Volumes add the variety to a flat wall.
- Make it as Tall as you Can: 8 ft of vertical is not much and traverses get old. Try to get a good 10-12 ft of height and at an angle this gives you several moves of climbing
- No Less then 8 ft wide
- 20-45 Degree Angle is what you want: vertical is boring
- Design Around Using Minimal Materials: Wood comes in standard sizes and modifying your plan slightly to meet those lengths makes sense (if your wall angle is not perfectly 30 degrees no-one will notice). Especially based everything around the 4ftx8ft sheets of plywood.
- Adding a Roof at the End is Nice: If possible adding a short (2-3ft) vertical roof at the end adds a few extra moves and helps “complete” the boulder problems.
- Physically plan in your building space: In the location of the wall bring in a few long 2×4 wood pieces and physically see how much space the wall will take-up. Get an idea of the wall angle, where attachments will be, where the pads will be, where spectators will sit, etc. This will help figure out the final design.
- Lastly be Flexible as You Build: Plans always change as you actually start building. Be prepared for that.
Simple Design Idea: ~30 Degree Wall
- The most straightforward design is a 30 degree wall that is completely flat. A lot of climbing holds are made for this angle and nearly every type of hold can be used to enhance difficulty or make it easier. Also this angle forces you to use more upper-body strength and work on feet technique.
- User Group: All ability types can climb on this angle if you have the holds for them. Beginners will need larger jugs and solid feet while more advance climbers will need harder movements and tricky feet.
- Location: The below design allows for you to quickly modify as needed to work in your location.
- General Design: Efficiency is the name of the game. Minimal cutting, minimal material waste and minimal carpentry work is the goal.
- 8ft wide and 12 ft long of climbing panel is a good starting point. At 30 degrees this puts the top of you wall at ~10.5 feet. At 16 ft of climbing panel your wall will be almost 14ft high which is a really good height.
- If you only have an 8ft ceiling I still recommend the 8ft wide and 12 ft of climbing panel, but your angle will be harder at ~40 degrees, however the surface area is really important. At 30 degrees the wall surface will only be 9.5ft long which is not enough space.
Triangle Calculator Tool to determine Height and Length of Wall:
- Here is a link to a decent online tool which helps you figure out the size of your wall:
- http://saltire.com/HTML5/Triangles/Triangle%20Given%202%20Angles%20and%20the%20Included%20Side.html
- The tool is not perfect so you will have to tilt your head to visualize it
- Input 10 into Side BC. This will be the height of the wall (modify to the height of your space)
- Input 90 degrees into Angle ABC. This will be the top corner of the wall. (always keep this value)
- Input 30 degrees into Angle BAC. This means the wall will be 30 degrees (adjust as necessary 20-45 degrees)
- The output of Side AC will tell you the length of climbing panels you will need.

Sample Wall Angle at 10ft high, 12 ft of Climbing
Tools:
The tools you use will either frustrate you or help make your job easier. When we first built the wall we used minimal tools (mainly because we were in college and didn’t have access) and the whole process took a lot longer, had major issues, and frustrated the hell out of us. The nice thing about tools is if you buy good ones they will last for many years of abuse.
Suggested tools and uses:
- Corded Drill: On a wall you will need to screw in nearly 5lbs of screws, batteries die quickly on cordless but you keep on rocking with corded drills (plus they are less $$). A good one will run about $60.
- 3Lb Hammer: When you have to pound in several hundred T-nuts you want something that will do it right the first time. A 3lb hammer makes you more efficient and it is a useful tool for a lot of other things that might come-up. A regular solid hammer works good but make sure it is quality and not crap.
- Circular Saw: The only cutting tool that you will need. With smart design on your wall you will need to only cut 2×4’s, more complicated walls might require other cuts but the circular saw is the most versatile saw for your needs.
- Extension Cord: Spend the money and it will make your life that much easier. I like the Rigid ones that light up when plugged in.
- Quality Drill Bits and Screw Heads: A fresh drill bit will make sure you are drilling those t-nut holes square without damage to the wall. Screw heads will break so have a few extra on hand.
Budget:
Expenses are generally a key consideration when building a home wall. I have several other articles on expenses which you will find in the navigation. In general plan on the whole thing costing about $250-350 in hard material expense. Additionally about $200 worth of holds will get you started on your home woody.
[important] Continue to Learn More for Wall Planning[/important]
- What Angle to Build your Wall
- ROI of a Wall
- Building Your Climbing Wall
- Home Climbing Walls vs Commercial Climbing Gyms
- My Climbing Walls and Construction Details
6 comments
Skip to comment form
Hi Andy,
Great website. I’ve got a three car garage and the back wall is 18ft tall. I’m a total rock climbing novice but it seems like a great space for a climbing wall. My main question, is 18 feet too tall for crash pads? or would I have to use some kind of auto belay?
Thanks,
Clint
Author
18ft is on the high side but is manageable with good crash pads. You will probably want to have a longterm solution with good mattresses and maybe cover with a foam layer. You can always set the routes to finish lower until you figure out the padding. Also you may want a downclimb route to save your ankles from dropping from that height all the time.
Hy Andy,
I would like to ask you, about the degree of a wall. I heard from diferent top climbers talking that they have at home a climbing wall at 40° , which is perfect for developing strengt. Can you tell me if they mean 40° from the floor, or from the wall (like your drawing above) ?
In my mind I always take the horizontal line as 0° and from that point I’m going up to the verical which is 90°.
Your blog is very useful. Thanks a lot!
Francesco
Author
So climbers refer to angles opposite of normal people and this diagram explains it best where this wall is a 34 degree wall (Angle A): http://andylibrande.com/homeclimbingwall/wp-content/uploads/2010/08/Triangle-10x12x34degrees.jpg
A Zero degree wall is perfectly vertical (instead of 90), a 45 degree wall would be more steep then the picture above, and a 60 degree wall is approaching the angle of roof climbing and is very over-hung. This is because it is measuring the angle of the wall from the foot or starting place instead of from the top.
In my opinion any wall 30-45 degrees is ideal due to strength training and hold selection. Anything less then 30 degrees quickly becomes slab problems on a home wall due to hold selection (whereas in real-rock 20-30 degrees can be pretty steep when doing sport/trad). 60 degrees is nice to have as a roof but not if that is the only angle of your wall unless you are training a specific purpose.
Hi
What padding do you recommend for a 12ft out door wall.
Author
I prefer mattress that I have collected over the years. With an outdoor wall you just have to worry about storage of those mattress so they don’t get too nasty, but I have been able to collect several very nice mattress for free. Other options can be very expensive and usually the best option is to use existing crashpads; if you don’t have a crashpad investing in a large BD Mondo pad or something similar may be $$ up front but will last for years and can easily provide the majority of the coverage you would need. I know people have handmade crashpads before with varying level’s of success: http://mountainproject.com/v/106655428