
In college I was inspired to build a home woody when someone introduced me to a free-standing outdoor wall. We had a large backyard and since I was living with three other climbers we felt that it would be an awesome addition to our house. After dealing with some land-lord issues we moved it into the garage which worked out perfectly. Since 2005 I have built 4 different walls.
Climbing Wall #1: First experiment that turned out surprisingly well. Free standing structure that was 8 feet wide, ~16 ft of surface climbing, about 12-13 ft at tallest point, approx 30 degrees. Built a sweet arete on the rightside as well. The whole frame was 2×4’s with CDX plywood and the supports were two 2×6″ pressure treated beams.
Ben climbing on the wall. The garage was nice and large but very shitty. In the winter the wind would blow through the holes in the walls making it hard when it was real cold to climb. Otherwise the garage served as a great party room.

Side view of the wall. It was freestanding with the upper supports going towards the ground and pushing against the wall of the garage. We also built the arete on the RH side which offered a few extra fun moves. The 2×4 coming directly out of the wall above the arete was there to support that corner from flexing. It pushed-up against the garage wall as well.

Climbing Wall #2: (no pictures) Only wall that was not free-standing. Took advantage of a friends garage and put a wall directly into the roof in an garage attic. 8 ft wide x 12 ft long, about 8 ft at highest point, approx 45 degrees (maybe steeper).
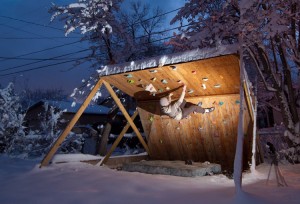
Climbing Wall #3: Built in a relatively small garage out of climbing wall #1, this wall was also freestanding and had an angular cut at the top to fit into the garage. Added a roof feature directly into the garage roof-beams. 8 ft wide, ~12 ft of surface area, about 9-10 ft high, ~30 degrees; roof added another 2-3 moves near vertical. Awesome garage and could use it year around.
Here it shows the wall built with the roof feature. The wall was freestanding with a beam up high on the LH side down to the ground and then stopped by the garage wall. The RH side used a short beam to keep it upright. As a result there was flex in the middle which was fixed by attaching a thin metal framing attachment from the wall to the garage ceiling. The Volume was also a key enhancement to the wall.

View from the other side of the wall. We learned to set problems to take advantage of the roof transition. The garage also had a wall down the middle of it which was one of our limiters when we built the wall.

READ ABOUT MY CURRENT WALL HERE
Recent Comments