
The Woody:

Yep…it is a lot of fun. Granted it has some interesting obstacles, however it is a real sweet climbing wall.
I have a fair amount of experience building climbing walls and as a result have learned a lot about climbing holds, route-setting, and building stuff along the way. It is really fun to have projects like these and enjoy them with your friends.
So welcome to my wall and since I like to talk, I decided I could post a lot more my ramblings here for posterity.
Enjoy!!!!
More Information on My Climbing Wall:
- Wall Specifics:
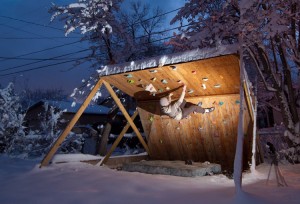
- Free-Standing Climbing Wall
- Sits outdoors in the elements
- Top and back is covered with house siding sheets to prevent weather damage (and also makes t-nut access difficult)
- 12 ft wide and ~9 to 10ft at it’s highest (effective height is ~9ft due to upward slope of ground
- Bottom Section of the wall:
- 12ft wide by 8ft long x ~6 ft tall (due to angle). Angle is ~30 degrees
- Built using 3 4×8 CDX plywood sheets and a 2×4 frame
- Roof/Upper section of the wall:
- 12 ft wide x 6 ft deep angle set at ~70 degrees
- Built using 3 4×8 CDX plywood sheets, mostly a 2×4 frame with a 2×6 header across the front span. Additional strength beams run across the top middle (2×4’s joined together) to prevent sag in the middle span.
- Supports:
- 2×6″ pressure treated beams, length varies
- 2 short ones support the bottom section of the wall.
- 2 long beams attached to the outer points of the upper roof and go out into the ground. These keep the wall from tipping forward.
- 2 beams that run from the bottom corner of the wall to the upper corner of the wall. These provide all of the strength of the wall and prevent it from caving in on itself. These were installed last once all of the angles were figured out.
Volumes:
- Optimus Prime is my custom volume that I built. I have other volumes but Optimus makes the wall.
Photo Gallery:
Here is Whitney climbing on the wall during my first Bouldering Comp at my house (that is why all of the routes are taped). This gives a good view of the transition between the bottom and the top walls. The far blue painted thing is an addition that I screwed directly onto the supports.

Here is a view from the other side of the wal. Here you can see the blue addition on the RH side and that it is out on an angle. Here Jake is climbing a problem that traversed mostly along the roof and ended with both hands where his RH is in the photo. The wall gives you the opportunity to have enough moves to feel like a real boulder problem.

This is from when I first put on the Optimus Prime Volume with a picture taken from the ground. The volume in the upper LH corner of the picture (that is partially cut-off) is a simple triangle volume that I screwed onto the roof which adds a number of cool moves.

Here I am climbing on the Optimus and reaching onto the roof. Volumes add so much to any climbing wall that not having them means you are not utilizing your holds/wall space to its fullest.

Writings about Home Climbing Walls, Climbing Holds and Route-setting:
- Let me Introduce you to my Woody
- Optimus Prime Owns by Climbing Wall
- Teva Mountain Games 2008 – First IFSC Bouldering World Cup in the USA
- A List of Climbing Hold Companies
Photo Details of How the Wall is Built:
Below is a close-up view of the top roof section connecting to the bottom free-standing section. A simple pivot design and the attachment is pretty easy as long as you make sure that the bottom section is built with additional length on the upright so that it can attach. This also shows how I attach the lower uprights onto the lower wall (the spot where there are two bolts and only one has a washer/nut). Note this is a pretty messy build:

Below is the top of the roof of my climbing wall. This shows you the general frame structure. This could have been built a lot more cleaner then this. The most important thing to note is the long 2×4 that is upright spanning the top of the roof; that acts as a major reinforcement and keeps the roof from sagging in the middle since I only built this with 2×4’s. This was eventually covered with house siding material because the weather was severely damaging it:

Below is a photo of the backside of the bottom section of my wall. The frame was pieced together from another climbing wall and that is why it looks so messy and if recreating it should look a lot cleaner then this. The metal strips (which are not fully screwed down) help keep sway from happening in the wall and where eventually fully secured to the wall. This section I eventually covered with House Siding material to keep the water/snow/dirt from rotting the wood:

Below is another photo of the upper attachments on the climbing wall. On the left is the attachment of the upper frame to the lower frame and also shows the lower support attachment (the two bolts, one with a washer/nut and one without). Also in this photo on the upper right side is how the upper supports attach to the wall (kind of obscured by the branches). The 2×6 that is angled from the bottom of the photo and is cut into the joint is very important and is used to keep the wall from collapsing on itself; this is a solid attachment with screws instead of bolts. The other 2×6 running from the right and straight-up is the outer support that keeps the wall from tipping forward; it is connected by one bolt in the photo (another was added later) and the top section sticking up past the wall was trimmed down:

Lastly here is a overview photo of each of the components to the structure of the climbing wall:
6 comments
Skip to comment form
fantastic
Hey I really like this design. I have a woody, in my apartment and I was wondering if you could give me some tips on how build a roof section. Thanks.
Check it out here: http://randomstreamoc.blogspot.com/2012/06/rockwall.html
Hi,
this design looks great. I am going to use it for my build. One quick question…. How did you get the roof section up once it was built?
thanks,
Paul
Author
3-4 decent sized guys plus a 6ft ladder. The ladder was key to rest it on once we put the side that attaches up. Then it was held into place as we installed the front legs. Helps to have some extra hands in lifting it and if you can get two ladders that would make it go a lot smoother.
How many of the supports are in the ground? And, is it entirely necessary in your opinion to set any of them in the ground?
Author
All of the supports are just sitting on the ground and overtime have worked themselves into the dirt but are not anchored. If it is your own house and you are looking for a more permanent solution then you could put them into the ground (at least 16″ deep with concrete) and you will have a solid structure.